Showing posts with label Nude. Show all posts

Wednesday, 28 May 2014

Neons on Nude

Happy Wednesday

More than half way through the week already! Ive been working on some custom pieces of nail polish jewellery this week. A friend of mine is going to a wedding on Saturday and has treated herself to a pretty pastel dress especially for the big day. I am making a ring to match and also doing her gel nails on Friday night. The ring is taking a while as the drying time in between sponged layers of pastel polish is quite long but it will be totally worth it.

Time for another manicure inspired by the sunny weather we have enjoyed in the past week...


Thursday, 1 May 2014

Comparison: Barry M Lychee versus Barry M Almond

Good evening my lovelies

Ever since I first saw the release pictures of the Summer 2014 Gelly's from Barry M I have been reading lots of comments from eager collectors wondering if as polish addicts do we really need both Lychee and Almond in our lives... in short the answer is a resounding YES!

Almond (bottle shot) - Index and Ring Finger
Lychee - Middle and Little Finger 

Sunday, 26 January 2014

Swatch: Vintage Cream

Good evening my loves

What a fantastic weekend. On Friday night we went to a Spanish themed night at a friends house and ate the most amazing tapas and paella dishes all made from scratch by our hosts Jordan and Faye. On Saturday it was 'Sister Day' so Laus and I meet up with the dogs at midday, went on a lovely walk at the old quarry site and then had a fab lunch with a gin tinnie :-). Saturday evening we had a night of make up and wine. We each picked an extreme make up look and then recreated it. We had such a laugh and the pictures were awesome!

Tonight I am showing you a quick swatch...


Tuesday, 24 September 2013

Nails: Skulls and Roses

Good evening lovelies

I hope you are all doing well? I had such an amazing weekend with my family and friends celebrating my sisters birthday. We had a garden party hosted by my dad on Friday, a full English breakfast by the river on Saturday and then a lovely meal with 8 of our best friends on the Saturday night. Samantha and I even built our own balloon tower while we were decorating the room ready for the meal - Impressed! :-)


Friday, 14 June 2013

Inspired By: Bird Print Cami Top

Good Friday lovelies

Although I am really into contrasting nail art, every so often I am more than happy to completely co-ordinate my nails and my outfit. There is something cute about 'matchy' nails so when I wore a new bird print cami top this week I just had to design my nails to match (sort of)...


I started with a gorgeous base of Barry M Lychee on all nails. This colour is part of the Gelly range, so it is highly opaque, dries super quick and super glossy. Lychee is a very rich cream coloured nude and the perfect base for lots of nail art styles.

Using the small flying bird design from plate BM 315 I then stamped each nail several times, in several colours at several angles! The bottle shot above is Beths Blue by Models Own which stamped very well but very lightly. It looks almost lilac in these pictures.

Some of the other colours I used are Konad Psyche Pink (bottle above), Konad Red, Sally Hansen Grass Slippers and H&M Blue My Mind.

Below is a close up of my top so you can see the pretty bird print for yourselves :-).


How do you like this matchy nail art? Do you prefer to wear nails that contrast and really stand out or would you co-ordinate your outfit of the day to your nails of the day?

Have fantastic weekends

Lou xx
@L_i_P_P

Saturday, 16 March 2013

Taped Chevron nail art

Good evening lovelies

Time for some nail art that does not involve stamping... I know unusual for me, right?

This didn't turn out quite as I had in mind... I think mostly that is because of the colours I chose. The finished look really reminded me of the colours and designs that you would see on a cheerleaders school uniform! Do you know what I mean... or am I a little crazy off the nail polish fumes tonight :-)


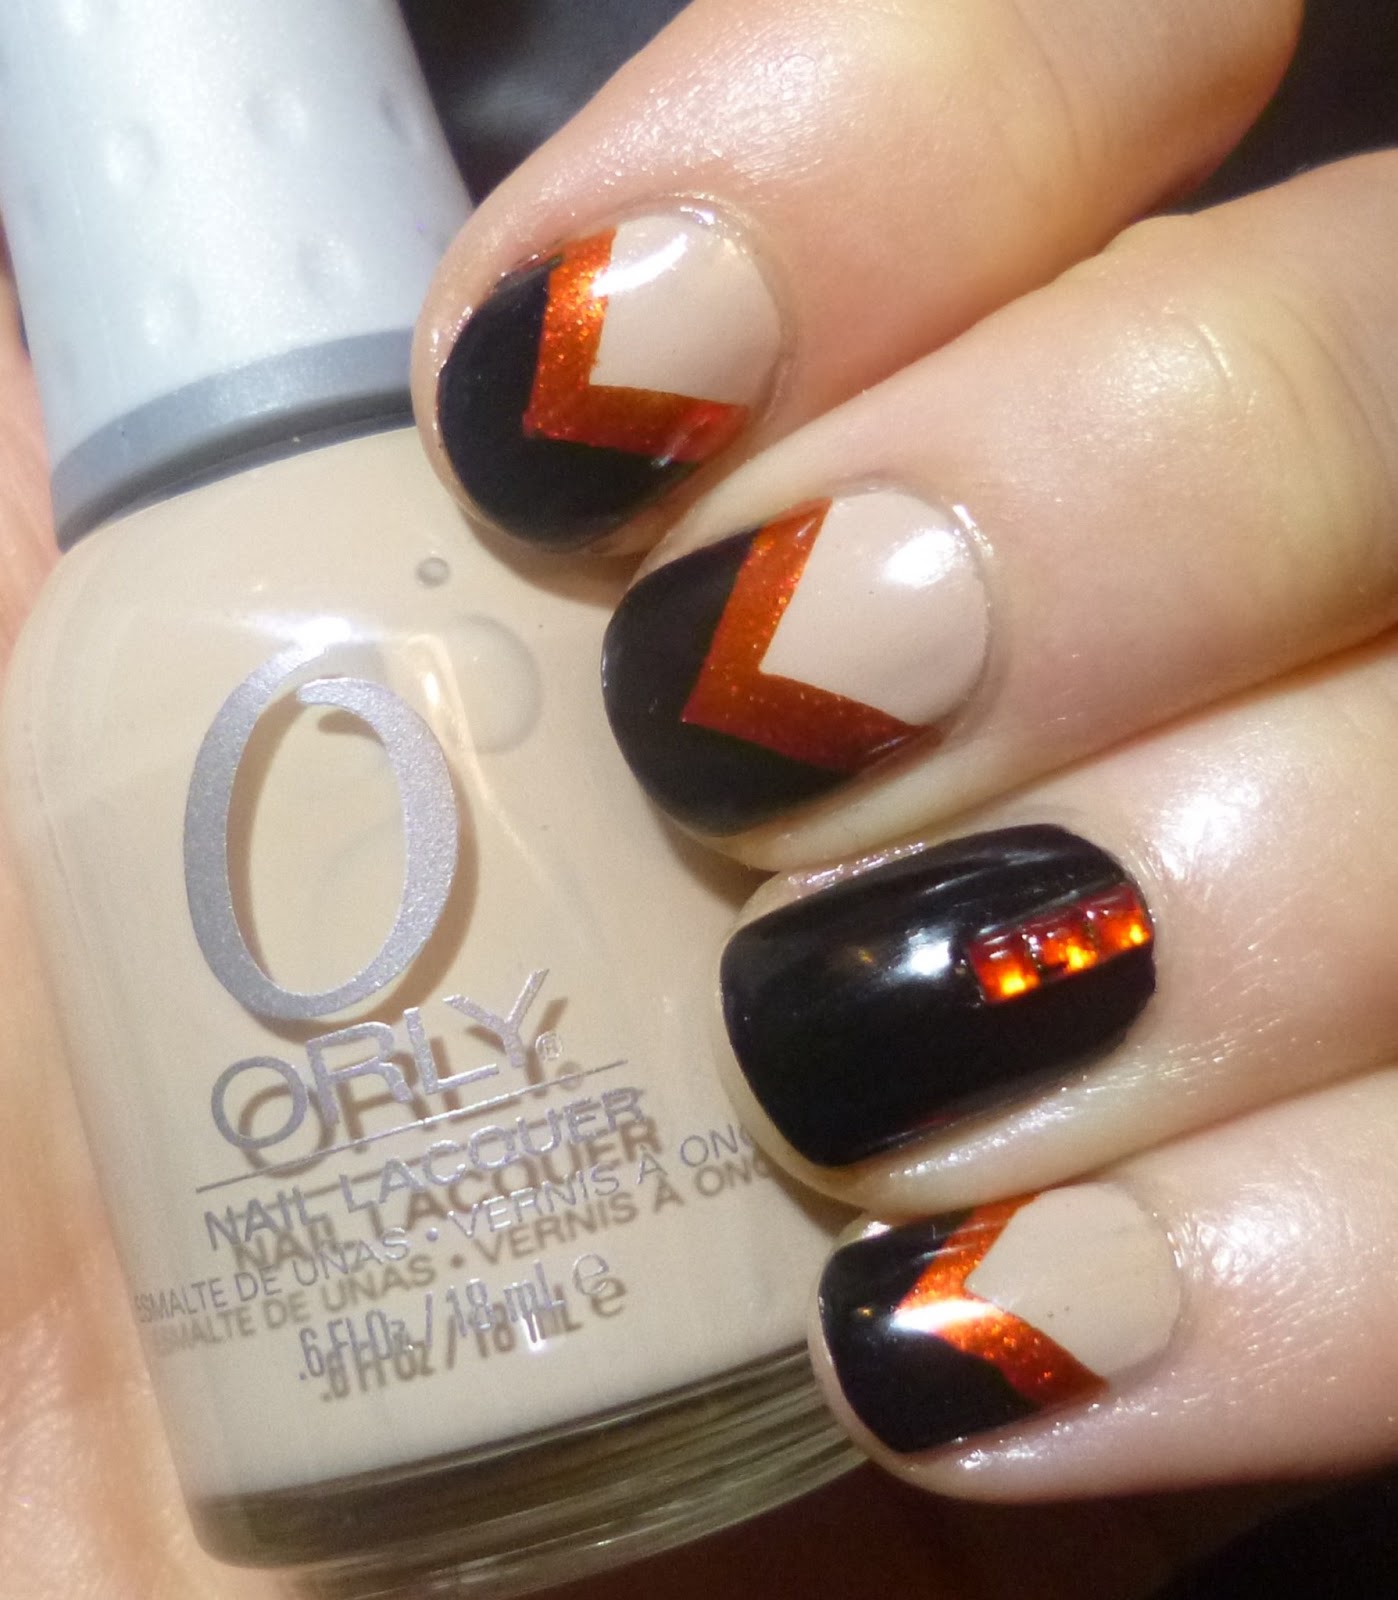
I started with two coats of Orly Glow on all nails except my ring finger. Glow is a very pale nude creme which if I was wearing it alone would need a third coat just to even it out but as I was covering more than half of each nail I stopped at two. At this point I added a layer of Seche Vite and went off to make a cuppa as you really need plenty of drying time before you start laying the tape strips down.


I taped off half off each Glow based nail with a pre cut chevron strip I purchased on eBay. I then painted the visible part of my nail with Orly Flicker. A stunning copper polish that I unexpectedly adored last time I wore it. At this point I added another slick of Seche Vite and sat with hubby to catch up on TV...


Finally I taped my nails off again using fresh chevron strips, this time covering a V shaped section of Flicker. Then using Illamasqua Boosh (black) I painted the tip on each nail as well as my full ring finger.


Here is a small tutorial I put together for Instagram... I cannot make it bigger as the picture quality is too low but I hope you can get the idea :-)


Finally I added three small square rhinestones to the accent nail and covered the whole lot in one more coat of Seche Vite.


This was a labour of love caused by the necessary drying time in between each colour layer but I like the end result and will definitely use these pre cut strips again. You could of course free hand the chevron shape if you have a steady enough hand (I do not).

Hope you enjoyed this post lovelies?

Louise xx
@L_i_P_P

Friday, 8 March 2013

I Heart Greenberry and Lychee

Happy Friday lovelies!

What a week it is been for little sis and I... I am glad it is Friday and hope I can now have a nice weekend with friends and loved ones :-).

Tonight I am going to show you this stunning green polish from the latest Barry M Gelly releases... I give you Greenberry...


It's aqua... It's jade... It's green and gorgeous!


Due to the absolute gorgeousness (is that a word?!) of this green polish I decided to keep my nail art simple and just go for a nicely coordinated accent nail. I used two perfect coats of Greenberry on all nails except my ring finger which is two perfect coats of Lychee (from the same Barry M collection).


Then using my trusty Orly dotting tool I started adding random sized dots until I had a shape that looked like a heart :-). This is the first time I have made an actual shape with dots and I am pleased my first attempt looks more or less as I intended it too.


I am so pleased with the three shades I purchased from the latest Gelly collection and I will no doubt treat myself to the fourth one next time I am in the city.

Have a fantastic weekend :-)

Louise xx
@L_i_P_P

Tuesday, 5 March 2013

Boosh and Lychee: Spots and Glitter

Good evening lovelies

Happy Tuesday. I had a fantastic day today - I was on a nail art course learning how to perfect some free hand designs using acrylic paints and also how to make some clever designs in gel polish before you cure it.

Unfortunately tonight I have to go away for work so will be travelling for about 2.5 hours to get to the hotel and hopefully get a good nights sleep before a couple of days of intense meetings. Luckily I have my fabulous little sister to keep me company which should distract me from how much I will miss Mr L_i_P_P and our doggies.

Onto my nail of the day...


For this eye catching manicure I started with a nice and simple Black and Nude polish combo. The glossy black is Illamasqua Boosh and the creamy Nude is Barry M Gelly in Lychee. I finally treated myself to three polishes from the latest Barry M releases.


Boosh applied like a glossy black dream and Lychee really is the perfect nude. I did two coats of each polish and was tempted to leave them looking that simple... of course the nail art bug took over :-)


Using my trusty Orly dotting tool I used Boosh to add some simple large and small dots to the two Lychee nails. It is the first time I have used different sized dots in this way and was really pleased with how effective they look.


Finally to add a bit of glitz I used Chit Chat Raspberry Glitter on just the black nails. I love black and pink together :-)


I was really pleased with this nail of the day and I am pretty sure you will see more dots like this very soon

Louise xx
@L_i_P_P

Saturday, 26 January 2013

Glow and Bronze

Good evening lovelies!

How has your Saturday been? I have spent a marathon 8 hours swatching some amazing Orly polishes today! Seriously I have never spent so long sitting at my nail desk surrounded by polishes and the funny thing is I wasn't doing it for myself! I am actually putting together some pictures for my friends Valentines and Mothers Day promotion for her new job at Barkers, a Hairdressing and Beauty supplier based here in Norwich.

I will of course feature the pictures at some point over the next few weeks but until then trust me when I say I there are some real pretties to look forward to :-)

Onto my nail of the weekend...


This gorgeous and neutral little manicure starts with a base of Orly Glow. Glow is a very subtle nude creme finish polish. By nature these polishes usually require three coats for perfection and this polish was no exception. However it was love at first sight for me and I have even included two swatch pictures for you to enjoy below.


Gorgeous, right?!


I then created two glitter accent nails by applying one perfect coat of Orly Watch It Glitter. This stunning glitter is made up of rose gold and copper particles and looks so pretty over this nude creme base. However I am sure it will also look stunning over a nice rich navy or teal jelly fnish polish.


With flash...


Finally I stamped this really pretty flower and vine pattern from my new Gals plate GA 47 using Primark Bronze Foil. Such an awesome stamping polish for just 50p per bottle!


One more bottle shot of Glow as it really is gorgeous and I hope you like it as much as I do.


Enjoy the rest of your weekends my lovelies. Have you got lots of lovely plans for Sunday? Mr LiPP and I are off into the city for a spot of shopping and maybe a nice lunch somewhere :-)

Louise xx
@L_i_P_P

Monday, 22 October 2012

Dont Pretzel My Buttons and Stripes

I would like to introduce my first polish from the OPI Germany collection - Don't Pretzel My Buttons.

This is one of twelve shades recently released and I have at least five others from this collection on my wish list.

OPI describe Don't Pretzel My Buttons as a haute honey-beige that can always make you smile. I will leave it to you to see if you think that is accurate and true...


This manicure started with three coats of OPI Don't Pretzel My Buttons. It takes a little patience to build this colour as it is very creamy which means it drags easily if you don't let each layer dry completely before starting the next. It is a very pretty nude though and a great base for nail art.


Using strips of tape I then sectioned off my nails and painted a thick coat of Barry M Pink Flamingo down the centre of each nail. As Flamingo Pink was drying I gently removed the strips of tape using tweezers.


Finally to complete this look I added some cute little gold square studs from the Born Pretty Store.


Flamingo Pink turned out to be the perfect accompanying colour to Don't Pretzel My Buttons and I was really pleased with how this look turned out. Having stripes down the centre of each nail made my nails look much longer and really eye catching all day at work.

Do you like this new shade from the OPI Germany collection? Do you own any of the other shades?

Louise xx

Monday, 1 October 2012

Jelly Glitter Sandwich

Creating a jelly glitter sandwich has been on my to do list for a while. When I first purchased this very sheer but pretty nude polish I knew I would save it for this very occasion. Here is a picture of the finished jelly glitter nude sandwich.


To create this look I started with two coats of Barry M Nude. This polish is a sheer jelly that would not build to a full coverage no matter how many coats you applied. Other bloggers have described this polish as your-nails-but-better and I have to agree. It evened out the discoloration I have from constant wear of brightly coloured polish and made my nails look shiny, healthy and natural.


To create the sandwich filling I used a clear based glitter polish which contains a mixture of gold hex glitters and lots of micro fine glitter particles. It was part of a set from Primark (of all places) and whilst it smells very strongly of chemicals I really love how it looks.


To complete the sandwich I then turned back to Barry M Nude and added another two coats on top of the glitter. This creates a really pretty but subtle look as it stops the gold glitter from looking quite so bright.


What do you think of my finished jelly glitter sandwich? Is this a look you would go for?

Thanks for reading

Louise xx